« Previous -
Version 7/133
(diff) -
Next » -
Current version
Vangelis Koukis, 10/10/2011 04:41 pm
snf-image
snf-image is a Ganeti OS Provider primarly used by Synnefo.
It is written from scratch and allows Ganeti to launch instances from predefined or untrusted custom Images. The whole process of deploying an Image onto the block device, as provided by Ganeti, is done in complete isolation from the physical host, enhancing robustness and security.
There are also additional hooks that can be enabled at image deployment. They allow for:
- changing the password of root or arbitrary users
- injecting files at arbitrary locations inside the filesystem, e.g., SSH keys
- setting a custom hostname
- re-creating SSH host keys to ensure the image uses unique keys
snf-image has been used successfully to deploy many major Linux distributions (Debian, Ubuntu/Kubuntu, CentOS, Fedora), as well as Windows 2008 R2.
snf-image requires ganeti-os-interface v20 to operate.
It introduces the following OS parameters:
img_id(/required/): the unique id of the image as known by the storage backendimg_format(/required/): the image format (extdump and ntfsdump [dd] currently supported)img_passwd(/required/): the passwd to be injected inside the imageimg_personality(/optional/): files to be injected into the image filesystem. It is a JSON-encoded list of files to be injected: every file is defined by its path and base64-encoded data. This format follows the notation proposed by the OpenStack Compute API v1.1. [more... ] for defining server personalities.
The snf-image Ganeti OS Provider is released under a 2-clause BSD Licence.
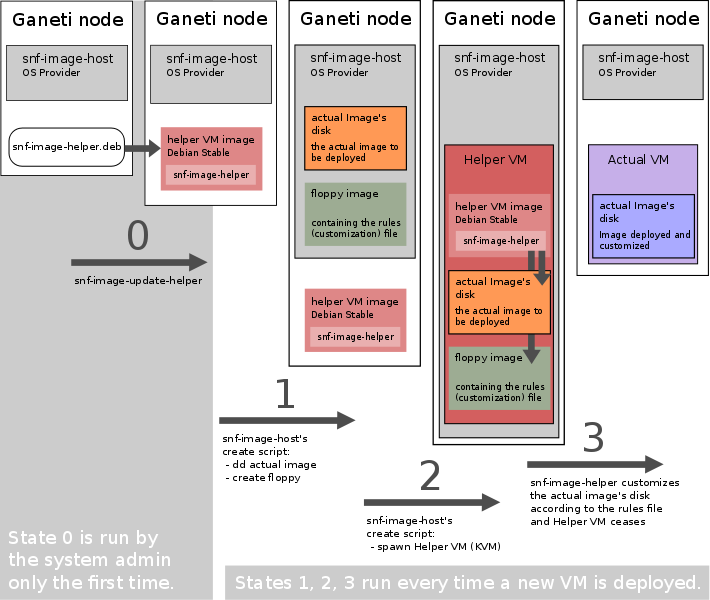
Architecture
Download
Installation
Before installing snf-image be sure to have a working Ganeti installation in your cluster. The installation process should take place in all ganeti nodes. Here we will describe the installation in a single node. The process is identical for all nodes and should be repeated manually or automatically (e.g. with puppet).
- Download the snf-image-host debian package as described in the download section.
- Install the snf-image-host debian package:
# dpkg -i snf-image-host_version.deb
- If the dependencies are not met, install all the dependencies using
apt-get install - Download the snf-image-helper debian package as described in the download section and store it in a handy location.
- Do NOT install the snf-image-helper debian package in the Ganeti node (the package should be present but NOT installed in any node).
- Configure the packages, as described in the next section, before you can start using the new OS Provider.
Configuration
Once you have installed snf-image-host in the Ganeti node and also snf-image-helper is present, proceed with the following configuration:
- Edit /etc/default/snf-image and set the HELPER_DIR variable to a directory in which all snf-helper related stuff are going to be stored (the directory should be able to store at least 700MB of data)
- Move the snf-image-helper debian package inside this directory and edit the HELPER_PKG variable in /etc/default/snf-image accordingly
$ mv /path/to/handy/location/snf-image-helper_version.deb HELPER_DIR/
- Update the helper-vm image and related data:
$ /usr/bin/snf-image-update-helper
Features / Hooks
Community & Support
- Bug-reports: snf-image-bugs@lists.grnet.gr
- Support: snf-image-support@lists.grnet.gr